In the implementation 1
In the previous implementation 1, we proceeded with the initialization of Peerjs and the acquisition of MediaStream as a processing flow for work preparation.Up to this point, smart glasses and monitoring terminals have unique IDs and connected to the signaling server, and access to their own cameras and microphones is possible.
2.Normal work processing flow
Next, as a processing flow during normal work, proceed from signaling to the part where smart glass camera images are displayed on the monitoring terminal in real time.
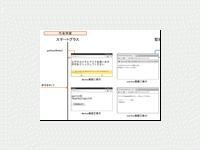
If you use Peerjs to connect to P2P with other PEER, you must specify the unique ID of the connection destination PEER.This time, simply post the unique ID (F9uyRHV2LZWLJTT9) displayed on the smart glass connection waiting screen (Device screen ② / left figure below), and to the input form of the monitoring terminal (monitor screen ② / lower right).I implemented it.
接続要求の送信画面Click the "Call" button on the monitoring terminal to call the MakeCall method of MonictorClass and start signaling processing.
monitor.coffee
$('#make-call').click ->calltoId = $('#callto-id').val()video = $('#device-video')mc.makeCall(calltoId, video, connecting, waiting) # 接続処理実施The MonitorClass MakeCall method conducts a MediaConnection connection request and a DataConnection connection request at once.
First, let's follow the connection processing of MediaConnection.
MediaConnectionAn object that wraps MediaStream replaced by RTCPEERCONNECTION on Webrtc.
MediaConnectionの確立First @peer.By calling CALL (), a mediaConnection connection request is issued from the monitoring terminal to the smart glass (Offer transmission).At this time, pass the connected monitoring terminal MediaStream to the argument.
On the monitoring terminal side, the MediaConnection object can be obtained at this stage, but it is not available yet because the P2P connection has not been established.
remote-monitor.coffeeclass MonitorClass extends BaseClass...makeCall: (callto, video, connecting, waiting) -> ... # MediaConnectionの接続要求処理 mediaConnection = @peer.call callto, @ls # calltoに向かってMediaConnectionの接続を要求(Offer送信) @connect mediaConnection, video, waiting # BaseClassから継承したメソッドconnect呼び出し# DataConnectionの接続要求処理 ... # DataConnectionのイベント処理 ...
The Connect method implemented in BaseClass describes the event handler when the connection with the event handler when the mediaConnection connection is established (described later).
When a smart glass receives a connection request relayed to the signaling server,@Peer.ON ('CALL', CALLBACK) event occurs and the set Callback function is called.
As described below, when receiving a connection request, the connected mediaStream of the connected smart glass will be reply to the connection (Answer).
remote-monitor.coffeeclass DeviceClass extends BaseClass...onCall: (video, connecting, waiting) -> console.log "onCall" # @peer.on('call', callback)イベント発生 @peer.on 'call', (mediaConnection) =># 監視端末からの接続要求を受信した際の処理console.log "peer.on 'call'"mediaConnection.answer @ls # 接続元(監視端末)へ接続受諾を返信(Answer送信)@connect mediaConnection, video, connecting, waiting # BaseClassから継承したメソッドconnect呼び出しThere are several event handlers that can be set in MediaConnection, but the following two are important.
remote-monitor.coffeeclass BaseClass...connect: (mediaConnection, video, connecting, waiting) -> ... # MediaConnectionのイベント処理 mediaConnection.on 'stream', (stream) =># 接続相手先のMediaStreamが利用可能となった際の処理console.log "mediaConnection.on 'stream'"video.prop 'src', URL.createObjectURL(stream) # 接続相手のMediaStreamをvideoタグのsrcに接続connecting() # 通常作業画面を表示 mediaConnection.on 'close', =># 自分もしくは接続相手先がMediaConnectionを切断した際の処理console.log "mediaConnection.on 'close'"@ls.getAudioTracks()[0].enabled = false # 自分自身のマイクをOFFにする@ems.close() if @ems? # 切断されたMediaConnectionはcloseしておくwaiting() # 接続待ち画面を表示
MediaConnection.When the ON ('Stream', CALLBACK) event occurs, connect the acquired connection partner to the Video tag SRC and display the normal work screen.
Also, MediaConnection.When the ON ('Close', Callback) event occurs, Close the disconnected MediaConnection and return to the connection waiting screen after turning off your own microphone.


